|
Tracking .....by Pete Crocker.
I've been asked to write an article on tracking. At first I was a little dubious, as this sort of thing is not my forte. What you are about to read is not the only way to teach your dog to track. This is only one man's opinion and a method that has worked for me with a number of my own dogs, and which has also worked for many people who have asked for my help in the past. If several parts of what you read sound familiar then you may be right, nothing I'm about to tell you is new I have adapted a number of styles to suit my needs.
Before we get in to the theory, first as a handler you have to be aware that you are working with an animal that already has a far great understanding on how to use his nose than you will ever have. As a handler/trainer it's our job to manipulate this raw natural ability and channel it in to the desired result, which is a 100-point track.
Food or Ball… Before you take your dog to the field you must decide what you are going to use as a reward, remember this will be what you use from the start of your training until the day your dog retires. If your dog has a high ball drive but has low food drive then I wouldn't waste my time with food. The reverse also works high food drive low-ball drive use food. Personally I prefer a combination of both, food on the track with a ball at the end. No matter what you decide to use as a reward both have there down sides, if it's food you choose to use, then the most common problem people have is knowing when to reduce the amount of food beginning used. If a toy or ball is your reward of choice then the biggest problem is usually speed. Hopefully this article goes someway to help you solve these problems.
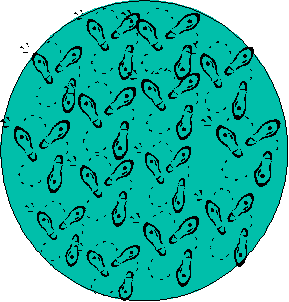
Imprinting… Let’s deal with imprinting using food reward first. I like to do my imprinting when the pup is around 14 weeks old. The following example I believe is the most important part of a dogs tracking training. Over a 3-week period, if done correctly, you will see your pup advance very quickly. Your first step is to cut up 2 or 3 sausages into small pieces (small enough that the dog has to use his nose and not his eyes). Once you have your container of food, take your pup on lead (3 metre lead) to the field, have someone hold your pup while you lay your pups first track. Find a nice flat piece of ground with the grass about 6 inches high, the next move is important, take a large step into the area you have chosen, stomp down an area approximately a metre and a half to 2 metres round. (As shown in the Diagram #1 below).

Once you have completed your circle, sprinkle the food evenly around the circle. Once this is done, again take a large step out of the circle. It is important not to link the circle with where you walk in. Pick your pup up and carry him into the circle, again taking care not to link where you walk in to the circle. Once in the circle put your pup on the ground, taking care to make sure your lead is loose. Let it drag on the ground if possible. Next, help the pup by pointing to the ground and giving him the command to track. When the pup finds a piece of food, praise him and pat him. Do not over do the praise, keep everything calm. Always keep the lead dragging on the ground, this is already setting the speed the dog will track at for the rest of his tracking career. If the pup goes out of the circle, don't say anything, let the pup discover on his own that there is no reward here. Don't let the track continue too long, 30 seconds to a minute is long enough. The pup doesn't have to eat all the food. When you think it's time, pick the pup up and carry him/her away from the track. That's the end of you pup's first track. Wait another 5 to 6 day's before your next track.
Track number 2… This track is exactly as the first. Cut up your food, have someone hold the dog, stomp the track and sprinkle the food in the crushed area and step out of the circle. Pick up the pup and step back into the circle, place your dog on the ground. This is where you will see the first signs that your dog is learning. Give your dog the track command. 9 times out of 10 the pup will put his nose to the ground. If this happens praise him, if not, help him by pointing to the ground and give the track command. Also during this second track you will notice that when the pup gets to the edge of the circle he will stop and come back to where you have stomped the ground. This is an indication that the pup has made the scent association. Once again do not let the track go for too long. 30 seconds to a minute is long enough. Pick your dog up and carry him out of the circle. End of your second track.
Track number 3 & 4… Once again wait 5 to 6 days between tracks. This is my preference; it's not set in concrete. Just remember that they are only puppies and there is no rush. Tracks 3 & 4 are exactly the same as your first two, the only thing I do differently is to let the dog spend a little more time in the circle. Be careful of this, remember, you should lift the pup out before he gets bored and looses concentration. Once track 3 & 4 are completed you are then ready to progress to the next stage. Before we do this lets recap on the finer points of the previous four tracks.
Food… This must be cut small enough that the pup has to use its nose to locate the reward. While searching for the food, the pup is also taking in the scent of your body odour and crushed grass, and anything else you may stomped on when doing your circle. The food must be sprinkled evenly about the circle.
Laying the circle… Care must be taken to take a large step into the area, making sure you do not connect where you walked in with the circle. You need to keep the pup in the circle at all times and not give him the opportunity to track you out. Ground conditions are also important in the early stages of tracking, best conditions grass lush and around six inches long.
Lead… Ideally your lead should be around 3 metres long, this is so you can have a loose lead at all times. This is important as this will help to set the speed that your dog tracks later in life. Remember when the pup is in the circle your lead must be on the ground at all times.
Praise… Praise is extremely important, it should be calm and given at the correct time. An example of when not to praise - if the pup has his head in the air, don't tell him he is a good boy. Before you do your first track must have your commands worked out. An example – the command to track could be something like “find’, “track”, “seek” or any thing else you want. Once you decide what command to use, be consistent and stick to this command and this command only. Don't babble and tell your dog a story, this will only distract him and means absolutely nothing to him. Don't over use your command, on your first circle put your pup in the middle, point to the ground and tell him to “track”, when his nose goes to the ground repeat the “track” command and tell him he is a good boy. If the pup continues to eat the food, don't interfere by patting and talking to him, just give your “track” command every now and again. Maybe once or twice during the first circle reach down and pat the dog. If this interrupts the pup, discontinue and leave the pup to search by himself, only pointing to the ground and telling him to “track” when he needs it. When giving tactile praise on the track, make sure the praise is very calming, long slow stokes down the side of the body not over the head area.
Time… Your first two circles should be kept very short, around 30 seconds to a minute. The pup does not have to eat all the food, finish the track with the dog wanting more. Circles 3 & 4 can be slightly longer, a minute to a minute and a half. Remember you don’t want the pup getting bored and gazing around the countryside.
Straight line track… After a break of 4 or 5 day's we are ready to start our first straight line track. But before we do let me explain why I lay the track the way I do. Firstly let’s discuss the placement of the food. I've seen this done in many ways, the most common mistake I see people make is not bending down and placing the food in the foot print, but instead choosing to drop the food from around waist height. The problem with this is that when the food hits the ground it can bounce anywhere, this defeats the purpose of using food at all. What we are trying to achieve is that the pup learns a good technique by going footstep to footstep. So it's worth the back strain, as after 5 or 6 tracks we start to wean the pup of the food drops.
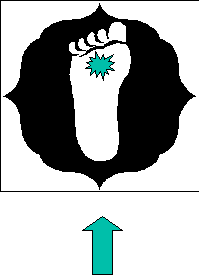
When I lay my tracks I always place the food in the toe end of the footprint. (See Diagram #2). This is so that the dog picks up the scent of the track at the heel of the foot print and get his reward when reaching the toe. This way the pup learns that the scent of the crushed vegetation and that of the tracklayer will lead to his food reward.

The next step is to ensure the wind is always behind you (arrow in diagram indications window direction). Even on a still day there can be a very slight breeze. If you are uncertain which direction the wind is blowing throw a few pieces of grass in the air. If it's a still day you could try something like a feather, you may find there is a slight breeze. The reason I always have the wind directly behind is to encourage a deep nose and to teach the pup to track ground scent and not the odour of the food drops.
First Track … The length of the first track is normally between 20 - 30 metres. I try to find an area of grass that is about 150 cm high. (You don't want it to high or it will cause the dog to lift his head.) With the wind behind me I begin as with the circles, taking a big step to the start, and then in the toe of each footprint I place a piece of food. I do this for the first 4 steps and then I leave the next 4 blank. I then place a tracking peg at the left side of the track. Now I place food again in the toe of each footprint for the rest of the track (20-30 metres) and at the end of the track I place a large pile of food (a couple of handfuls). I then take a large step away from the track, this is so the pup does not track me out once the track has finished.
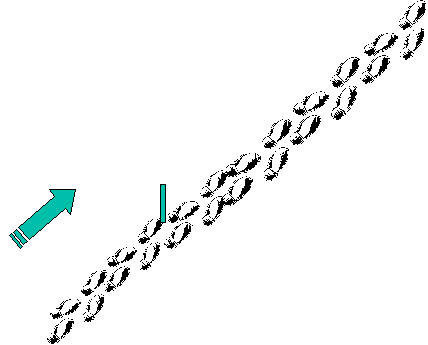
I then fetch the dog (which has been tied to the fence or held by someone). I take the dog towards the track, avoiding area where I walked in. I don't want the dog tracking before I'm ready. Also, I don't stop the dog pulling or playing as we walk to the tracking peg. I often see handlers correcting the dog for pulling or constantly on the dog’s case. In my opinion this only causes stress in the dog and hinders the dogs learning ability. Arriving at the track I bring the pup in on an angle to the peg. (I will explain the reason for this soon.) I stop the dog about a metre short of the start. At this stage I spend time calming the dog by holding him under the neck and stroking him slowly from shoulder to flank. I may spend 30 seconds or longer here as I will not start the dog until I'm happy he is in the right frame of mind, calm and not panting. When the dog is older you can sit him or lay him down. We are now ready to start the track. I do this by taking the dog to the first foot print without food, this is the first empty print from the start of the track. At this stage you will have to help the pup by pointing to the track and giving the command to “track”, (this is the command you taught him when doing the circles.) The first direction I encourage the pup to go is actual the wrong way. I let him go back over the first 4 foot prints, picking up the food as we go, he then runs out of scent because of the large step we took at the start, as with the circles, it's like hitting a wall. The pup then turns and heads in the correct direction. With a pup, I stay along side him, almost slightly in front. This is so I can help the pup if he needs it. I don't talk to the pup too often, every now and again I may give the “track” command and tell him he is a good boy, but if he is working ok, leave him to it and don't interfere. I save most of my praise until he finds his reward at the end of the track. If you have a dog with good ball drive, take him away from the track and have a game for a few minutes. Once finished, put him away in the car or in his kennel. (Diagram #3 shows an example of a Track).

Explanation… Let me try to explain why I bring the dog into the track on an angle. Firstly in the past I have seen many dogs that walk straight to the peg and than the handler let’s them start tracking, or that’s what they think they are doing. The majority of the time what happens is the dog walks out 20 metres or so and suddenly stops, the handler tells the dog to “track” and then the dog starts casting and trying to find the track, which eventually most dogs do. But in the mean time the team has lost valuable points. This is part of the reason I am a firm believer in having a solid starting technique. Another benefit is that by bringing the dog in from angles, the dog must spend longer at the start, taking in much more scent than the dog I described that walks straight into the track. Also the dog has to work out which direction the track goes and by the time he works this out, he is in the right frame of mind and is concentrating correctly. It also helps with corners in young dogs. One thing I have neglected to tell you is that I never bring the dog in from the same angle, or even the same side, two tracks in a row. This is where it is a good idea if you keep a tracking diary.
Second Track … 2 or 3 days later I do my second straight-line track. This is much the same as the first day, approximately 20-30 metres long. The only real difference from the first day is I also lay a second track, approximately 40 metres long, laid right after laying the first, and before we get the dog. I then run the first track and after a short game with the ball, I then take the pup to the second track and prepare him, making sure he is calm and not panting after his game. When starting, remember to come in from a different angle to the previous track. Once you have finished, again have a short game and put him away. The reason I lay the two tracks simultaneously is that by the time you are ready to do your second it has aged 10 minutes. You have now begun to age your tracks. This must be done slowly with a young dog as the scent picture changes with age.
Third Track … Day three of straight-line tracks - once again is much the same as day two, with the only difference beginning another track of approximately 60 metres. Three tracks in one session is the maximum number I would attempt to do. Remember once again all three tracks are to be laid simultaneously and also remember to come in from different angles each time. Don't forget the wind should be at your back.
Fourth Track… I would do one more set of straight-line tracks exactly the same as day three, with two slight differences, the first being to leave the dog in the car or in his kennel while you lay the track. Normally around this stage of your dog's education he is getting pretty excited while you are away laying the track and this makes it harder to calm the dog at the start. The second change I do here is when laying the tracks near the end of the first track, before placing the two handfuls of food down I leave food out of the last 5-foot prints. On the second track I remove it from the last 10-foot prints. On the third track I take the food away in the middle of the track, leaving it out of 5-foot prints in two places during the track.
Summary
Food … The placement of the food should be in the front of the footprint, this is so the pup takes up ground scent from the heel of the footprint, then gets his reward, learning that the sent of crushed grass etc will eventually lead to food. The handful of food is always at the end of the track. The only time my dog finishes a track and there is no food is on Trial Day.
Wind direction… It is important that the wind is always at your back. This is to encourage the dog to have a deep nose.
Calming the Dog… I always calm your dog before the start of the track. I do this by holding a young pup under the neck and stroking the dog from shoulder to flank with long slow strokes. When the dog is older I get him to sit or down and do the same thing. In time the dog will approach the track and sit or down by himself. It’s all part of tuning the dog into the track.
Approaching the Track… On each track I come in from a different angle. This lets the dog spend more time on the start peg, taking in more scent while working out the direction of the track. Be careful not to set up patterns.
Tracking Diary… At this stage of the pups training I start to keep a diary. This helps you record conditions, problems the dog may encounter, what angle you came into the track each time, length, age etc.
Note… The next step in my dog’s tracking education is serpentine tracks, also increasing the length of my tracks and reducing the amount of food used. This will be explained in part 2 of my tracking article. I will also tell you how I would start a pup in tracking using a toy, as well as explaining how to introduce different crosswinds to a dog. Hopefully this article will be of help to people.
|

 design by